Consuming the Dynamic Content in custom sections
After mapping pages and data-fetching functions and choosing one of the methods for creating Dynamic Content via API fetching, use the data to render it in a store section. In this step, we will create a new Hero section, placed on a landing page, to render the image from the data.
| Before: Using Hero native section with an image uploaded from the Headless CMS. | After: Using a custom Hero section fetching the image content from an API. |
|---|---|
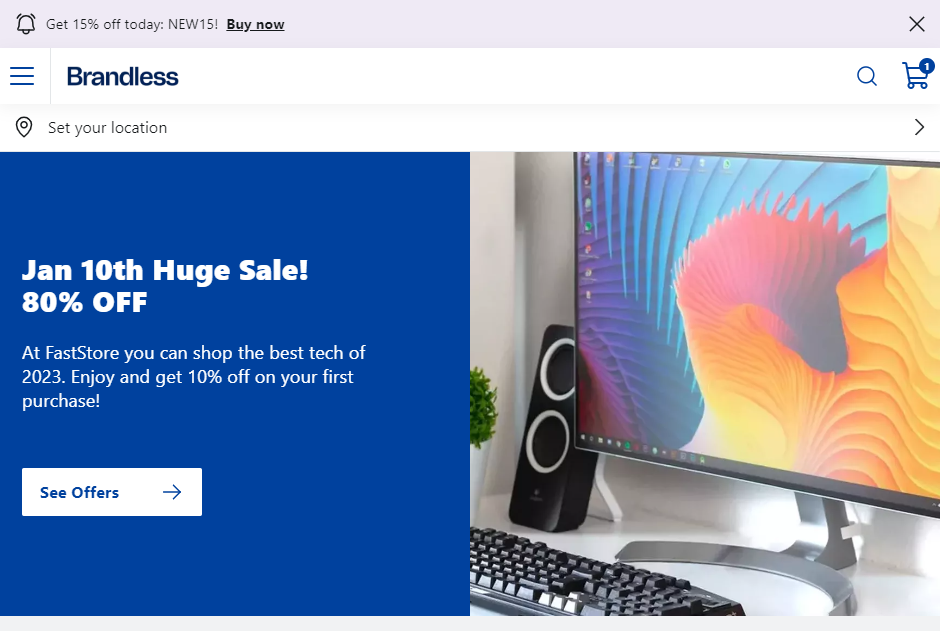 | 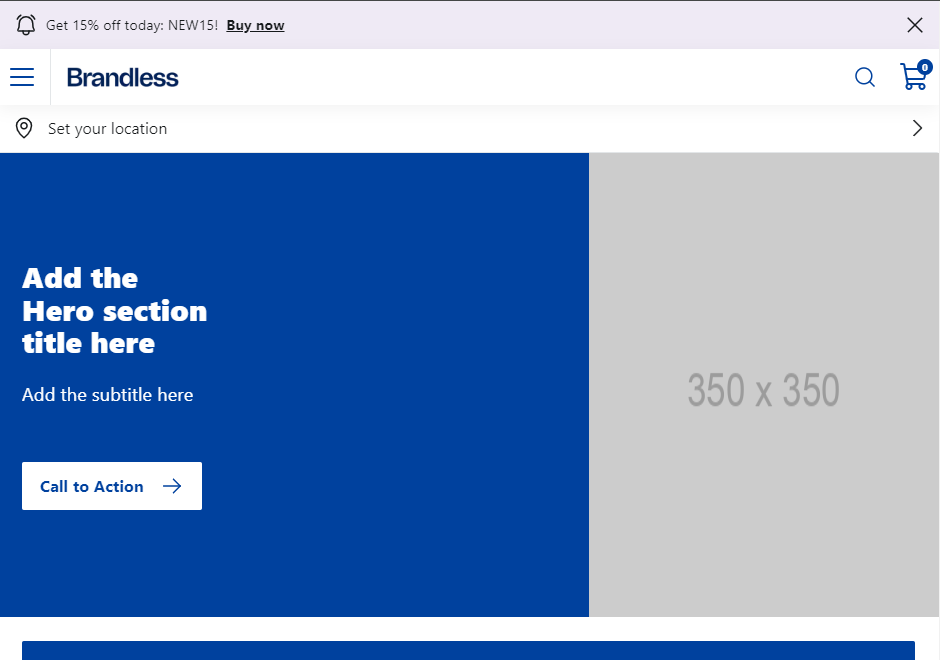 |
1. Creating the section
-
Open your Faststore project, and Inside
src, create the foldercomponents. -
Inside
components, create a subfolder namedsections. -
Inside
sectionscreate a file calledProductHero.tsx, and paste the following code:- The
useDynamicContenthook brings the data from the@faststore/corepackage. - The
ServerDynamicContentQueryspecifies the type of data that we will get from the FastStore API package. - Since we are working with Hero, we import the Hero component and its styles.
- The
useDynamicContenthook holds the information in thedatavariable. - In return, we validate the data and display the image in the Hero and the product's name using some HTML elements.
- The
-
Create an
index.tsxfile inside the components folder and paste the following code:_10import ProductHero from “./sections/ProductHero”_10_10export default { ProductHero };
This file helps import and export our new component. Now that the component is ready, let’s create its section schema for the Headless CMS.
2. Synchronizing the component with Headless CMS
To define a schema for the
ProductHero component within the Headless CMS, follow the steps below:-
Create the folders
cms/faststoreinside your project directory. -
Inside
faststore, create thesections.jsonfile. -
Paste the following code:_52[_52{_52"name": "ProductHero",_52"schema": {_52"title": "Hero with a Fixed Image",_52"description": "Add a quick promotion with an image/action pair",_52"type": "object",_52"required": ["title"],_52"properties": {_52"title": {_52"title": "Title",_52"type": "string"_52},_52"subtitle": {_52"title": "Subtitle",_52"type": "string"_52},_52"link": {_52"title": "Call to Action",_52"type": "object",_52"properties": {_52"text": {_52"type": "string",_52"title": "Text"_52},_52"url": {_52"type": "string",_52"title": "URL"_52},_52"linkTargetBlank": {_52"type": "boolean",_52"title": "Open link in new window?",_52"default": false_52}_52}_52},_52"colorVariant": {_52"type": "string",_52"title": "Color variant",_52"enumNames": ["Main", "Light", "Accent"],_52"enum": ["main", "light", "accent"]_52},_52"variant": {_52"type": "string",_52"title": "Variant",_52"enumNames": ["Primary", "Secondary"],_52"enum": ["primary", "secondary"]_52}_52}_52}_52}_52]
-
Run
yarn cms-syncto synchronize the changes. -
Go to the VTEX Admin, and access Storefront > Headless CMS.
-
Click
Create documentand chooseLanding Pageto create a new landing page. -
Add the new section.
-
Open the Settings tab, and in the SEO path, add the slug for the new landing page, for example,
my-landing-page. This step is essential because this slug is being consumed in theindex.tsxfile from thedynamicContentfolder and this slug identifies in the code which content we want to bring to the page. -
Click
Save. -
Open your terminal and run
yarn dev.Make sure you are logged in to your store account. If not runvtex login {accountname}. -
Open the localhost indicated in the terminal and add the
/my-landing-pageto the slug, e.g.,https://localhots:3000/my-landing-page. -
Go to the localhost available and refresh the page. You will have the section similar to the following: